
| Cerius2 Modeling Environment |
This section explains
Why read this section
![]()
Loading model structure files
This section tells you how to bring one or more models that are stored on disk into your current Cerius2 session. These can be models supplied with Cerius2 by MSI (see Models supplied by MSI) or models that you or someone else built and saved earlier (Saving individual models).
Building models is explained in Building Models and demonstrated in Introducing Cerius2. Saving models is discussed under Saving model structure files. File formats are presented in File Formats.
The basics of starting Cerius2 and using its interface are demonstrated in Introducing Cerius2 and described in The Cerius2 Interface.
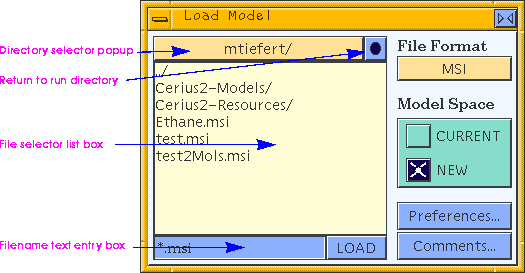
Select the File/Load Model... menu item (from the main control panel's menu bar) to access the Load Model control panel:

Navigate the directory structure and find the desired file(s):
To choose the target model space, set Model Space to CURRENT or NEW (see Handling multiple models for information on model spaces).
| If you load a model from a file into an already-occupied model space, all the contents of that model space are considered to be one model. |
There are several ways of selecting and loading the desired file(s):
A tutorial example of loading models can be found in Reading in additional models.
You can change how files of a particular format are interpreted as they are read in. For example, whether to use any periodic information contained in the file, whether the number of hydrogen atoms is to be checked and corrected, whether and how to fill in possible missing bonds, etc.
Please see the on-screen help for details on the functioning of each control in the Load Model control panel and the Load Preferences control panel.
Cerius2 supplies databases for a wide range of types of molecules and materials. These databases are contained in subdirectories of the Cerius2-Models directory (accessible from your run directory during Cerius2 sessions). These subdirectories include models of catalysts, ceramics, metals, minerals, molecular crystals, monomers, organics, polymers, sorbates, and others.
Many file formats besides the MSI format (see File Formats) can be imported if you need to use model files obtained from other programs or databases. However, transfer of all model data cannot be guaranteed when reading files that are not in MSI format.
Why read this section
![]()
Handling multiple models
Cerius2 can hold many models at one time, each in its own model space. This section tells you how to work with several models that are present simultaneously in the same Cerius2 session. The number of models allowed depends only on your computer's memory limitations.
This section includes information on:
Related information
Building models is explained in Building Models and demonstrated in Introducing Cerius2. Loading models is discussed under Loading model structure files.
The basics of starting Cerius2 and using its interface are demonstrated in Introducing Cerius2 and described in The Cerius2 Interface.
Basic model management tasks
Why read this section
When you have several models present simultaneously in the same Cerius2 session, you need to know how to make a model be "current" so you can work with it. You may also want to know how to display one or more models, name models, open a new model space in order to load or build another model, etc.
This section includes information on:
The model manager
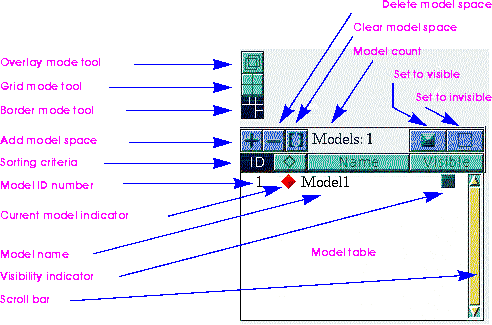
The model manager is part of the main control panel. When a Cerius2 session is started with an empty model space (the usual default startup), the model manager looks like:

Please see the on-screen help for details on the functioning of each control in the model manager.
Creating, clearing, and deleting model spaces
Model spaces are added automatically to accommodate models loaded from files or generated by application modules. For instance, when you use the Load Model control panel to read in a model from disk (Loading model structure files), the model is added by default to a newly created model space or (if it is completely empty) to the current model space.
When do you need to add model spaces?
However, for example, builders have no way of knowing when you may want to start a new model. They therefore assume that you want to continue modifying an existing model until you inform them otherwise.
To add an empty model space, click the add model space tool
![]() in the model manager. The new model space's name is added at the bottom of the model table.
in the model manager. The new model space's name is added at the bottom of the model table.
You may want to replace an existing model with a new one or perhaps realize you've built or loaded an incorrect model. Clearing a model space removes the model but allows its now-empty space to remain in the model manager.
![]() in the model manager. If no model space(s) are selected (Selecting model spaces), the current (Specifying the current model) model space is cleared.
in the model manager. If no model space(s) are selected (Selecting model spaces), the current (Specifying the current model) model space is cleared.
For many models, you can also select (Selecting atoms and groups of atoms) all the atoms of the current model and delete them (Deleting atoms and bonds) to clear the current model space. (Nonatomic information, if any, is not removed by this method.)
If you want to delete both the model and the space that contains it, click the delete model space tool ![]() in the model manager. If no model space(s) are selected (Selecting model spaces), the current (Specifying the current model) model space is deleted. The last remaining model space cannot be deleted.
in the model manager. If no model space(s) are selected (Selecting model spaces), the current (Specifying the current model) model space is deleted. The last remaining model space cannot be deleted.
A tutorial example of adding and deleting model spaces is found under Managing multiple models.
Specifying the current model
The current model is the one to which display, calculation, file, and other operations are applied.
To specify that a certain model be current, click the current model indicator (diamond-shaped button) to the left of its name in the model table. The current model is identified by a red diamond; all other diamonds are greyed out.
A tutorial example of handling multiple models is found under Managing multiple models.
Selecting model spaces
You can select one or more model spacess:
Controlling model visibility and the display mode
When you have several models in your Cerius2 session, you may want to view only the current model, or you may also want to view one or more of the noncurrent models. You may display them in individual model window panes or overlay them all in the main model window.
How they are displayed
The overlay mode, grid mode, and border mode display tools control how the model spaces are displayed in the model window:
![]()
A tutorial example of handling multiple models is found under Managing multiple models.
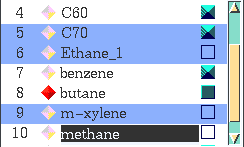
The following picture shows a model table with one current model that is implicitly visible (ID = 8), several visible models (IDs 4, 5, 7, 8), several invisible models (IDs 6, 9, 10), several selected model spaces (IDs 5, 6, 9), and one model that is being renamed (ID = 10), with scrolling needed to see the whole list):

Renaming models
Newly created empty model spaces are given the name Model#, where # is the serial ID number of the model space. Models loaded from disk into an empty model space are given a name based on the structure file name. If a model has or is given the same name as an existing model, the name is suffixed with _1, _2, _3, etc.
An example of renaming a model is given under Reading in more models.
Sorting model table entries
To assist you in browsing through the models stored in the model table, the model manager provides four sort-criteria controls. These controls enable you to sort model table entries according to model ID number, current model status, model name, or visibility.
To select the criteria by which models in the model table are sorted, select the appropriate control:
![]()
This section includes information on:
The simplest way to copy a whole model to a new model space is to make sure the desired model is current, then select (in order) the Edit/Copy and Edit/Paste menu items. A new model space is created automatically.
You can also select all atoms in a model and use cut (or copy) and paste (Moving parts of models from one model space to another) to move entire sets of atoms from one space to another. (Nonatomic information, if any, is not copied by this method.)
A tutorial example of copying model-space contents from one space to another can be found under Copying models from one model space to another.
Moving parts of models from one model space to another
You can also copy or move parts of models from one model space to another (or within the same model space) using atom selection (Selecting atoms and groups of atoms) and editing techniques (for how to specify the current model, see Specifying the current model):
Copying models to and from other applications
The cut- or copy-and-paste operations described in the previous section make use of your computer's clipboard. Thus, applications that can work with information stored in the system clipboard can make use of these structural elements (as does Cerius2). This enables you to cut and paste structural elements back and forth between Cerius2 and other applications such as Insight® II, ISIS/Draw, ChemDraw, Catalyst®, and Open Inventor-based applications on SGI systems that have the Molecular Inventor Execution-Only Environment (molinv_eoe) installed. However, other applications may not be able to use all the information associated with Cerius2 structural elements.
InPerson*selectionTimeout: 180000This changes the default selection timeout value to 180000 ms (3 min). The default value for Cerius2 is 180000, but you can also change it in your .Xdefaults file, using this format:
Cerius2*selectionTImeout: 180000
This section tells you how to save one or more models that are in your current Cerius2 session, to store them on disk. You will probably want to save models that you have built or modified and may want to use again. You should save your model before running any calculation or performing other activities that might change its conformation, if the original conformation of your model is important.
This section includes information on:
Building models is explained in Building Models and demonstrated in Introducing Cerius2. Loading models is discussed under Loading model structure files. File formats are presented in File Formats.
The basics of starting Cerius2 and using its interface are demonstrated in Introducing Cerius2 and described in The Cerius2 Interface.
Use of the file selection list box and other file selector controls to navigate the directory structure is presented in detail under Finding model file(s).
How to make a model be the current one is described under Basic model management tasks.
Saving individual models
Making custom directories
You may want to create your own directories or subdirectories in which to save models. For example, you may want to save models relating to a specific project together or save related models as a database.
>	cd ~/CeriusRuns

>	mkdir myModels
Alternatively, you can use the the text window and prefix a ! to the UNIX commands (Text window).
Select the File/Save Model... menu item (from the main control panel's menu bar) to access the Save Model control panel. This control panel is used to save the current (Basic model management tasks) model.
Use the file selector controls in the Save Model control panel to move through the file system to the directory in which you want to save the current model. (Newly created directories appear in the file selector list box when the appropriate parent directory is opened or reopened with the file selector controls or when the control panel is opened.)
A tutorial example of saving one model is given on Saving a model.
You can save files in a non-Cerius2 format. Some formats allow a choice of formatting options. To set them, click the Preferences... pushbutton to accesses the Save Preferences control panel. The controls displayed in this panel depend on what the Save format popup in the Save Model control panel is set to.
If you want to save only part of a model, select the desired part (Selecting atoms and groups of atoms), cut or copy it and paste it into a new model space (Moving parts of models from one model space to another), and save the new model.
Please see the on-screen help for details on the functioning of each control in the Save Model control panel and the Save Preferences control panel.
Model data that can be saved to file include atom coordinates (Cartesian, fractional, or internal), element type, charge, bonding connectivity, crystal unit cell, crystal symmetry, occupancy, and temperature factors. The exact combinations depend on the format you select from the Save Format popup in the Save Model control panel. The default MSI file format holds all model data.
Cerius2 has its own model-file format (.msi format) capable of storing every detail of any model in the Cerius2 modeling environment. You should always store your model files using the .msi format unless you want to exchange them with databases, other molecular modeling applications, or your own programs.
Saving all models
To conveniently save all models in the current session, save the session rather than its individual models (Saving the current session).
Why read this section
![]()
Working with Cerius2 sessions
Finding information
This section includes information on:
You should already know...
The basics of starting Cerius2 and using its interface are demonstrated in Introducing Cerius2 and described in The Cerius2 Interface.
Use of the file selection list box and other file selector controls to navigate the directory structure is presented in detail under Finding model file(s).
A Cerius2 session consists of all the models and data with which you are currently working, as well as application preferences that you have specified.
Starting a new session
Reinitializing Cerius2
| All unsaved models and data are lost when you start a new session, and settings in control panels are returned to their defaults. |
Saving the current session
You can save the current Cerius2 session at any time. After you do so, you can then resume that session at some later time (as described under Loading a previously saved session), either later while you are still running Cerius2 or after exiting and restarting Cerius2.
You may want to create your own directory or subdirectory in which to save your session.
>	cd ~/CeriusRuns

>	mkdir tutorialSession
Saving the current session
Select the File/Save Session... menu item (from the main control panel's menu bar) to access the Save Session control panel. This control panel is used to save the current session.
A saved session consists of a session file (.mss file extension) and a set of standard MSI-format structure (model) files. When you save a session, one model is written in the specified directory for each occupied model space. The session file contains application preferences, customizations, any cross-model linkages, and references to the saved structure files.
Saving individual models is described in Saving model structure files.
Loading a previously saved session
You can resume a previously saved Cerius2 session at any time.
When you load a saved session, the current session is reinitialized (i.e., unsaved models and data are lost and settings return to their defaults), all models referenced by the resumed-session file are loaded into model spaces, and application preferences are set to the values indicated in the resumed-session file.
Select the File/Load Session... menu item (from the main control panel's menu bar) to access the Load Session control panel. This control panel is used to load the session you want to resume.
You can now resume work from the point at which you saved the session you just loaded.
Loading individual models is described in Loading model structure files.
Using saved sessions as preferences settings
If you often need to change many settings before starting your work, you can load only the application preferences from a saved session file.
Nondefault application settings are saved when you save a session (What is saved as a session). (However, not all applications save all nondefault control settings when a session is saved.)
You may want to start up one of your typical sessions by changing all settings as desired, in the absence of any models. Then you can save this "empty" session.
Before loading or building any models, load your preferences by:
Information on controlling Cerius2 from prerecorded command scripts is given in Controlling Cerius2 from scripts.
Other customization activities are covered in Customizing the Interface.
