| Cerius2 Builders |
You can load the monomer units from which polymers are constructed from files supplied with Cerius2 or create your own monomers. You can also edit the monomers before using them.
Almost any of the Cerius2 simulation and computation modules can be applied to polymer models. Two modules that are particularly applicable to polymer models are C2·Blends and C2·Polymer Properties.
This chapter contains information on:
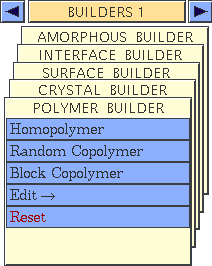
Controls belonging to the C2·Polymer Builder module are contained on the POLYMER BUILDER card, which is located by default on the BUILDERS 1 deck of cards. To access the POLYMER BUILDER card, click its name to bring it to the front of the deck of cards, which should now look like this:
Following some introductory material (below), this section contains information on:![]()
Monomer units
Monomers
Monomers (or repeat units) are the building blocks of polymers. A Cerius2 monomer is defined as a model containing one head and one tail group. Thus, only linear polymers can be built when a series of monomers is linked to form a polymer.
By default, the torsion angle between monomer units is determined by the conformations of the head and tail groups of the two monomers. However, this can be changed.
Monomer chirality is important in determining the configuration of the polymer. Monomers loaded from the Cerius2 monomer files already have chiral centers defined. You can also define (or redefine) chiral centers as desired.
You can also invert the monomer at its chiral center. For example, you might want to create a mirror-image pair of monomers for building an atactic or syndiotactic random or block copolymer.
Specifying monomer units
![]() Many of the polymer builder control panels contain one or more generic monomer choosers. These consist of a pulldown that accesses all monomers that are available to the program and an entry box that shows the name of the currently specified monomer unit.
Many of the polymer builder control panels contain one or more generic monomer choosers. These consist of a pulldown that accesses all monomers that are available to the program and an entry box that shows the name of the currently specified monomer unit.
The monomer chooser pulldown shows the names of individual monomers only in the current directory (class). To see the names of monomers in other directories, click the directory name. You can also enter the name of any valid monomer by typing it in the monomer chooser's entry box.
Please see the on-screen help for information about the monomer chooser(s) in any control panel in which they appear.
Monomer files
Cerius2 provides several directories of structure files for some common monomer types. These directories are subdirectories in the Cerius2-Models directory, which is automatically linked to from the directory in which you start up Cerius2. They are automatically listed in the monomer chooser pulldowns (see Specifying monomer units).
In addition (next section), you can create your own monomers by editing other models supplied with Cerius2 or can create your own monomer models from scratch.
Creating or editing monomers
Monomers can be created by assigning head and tail groups in models loaded from file or created using the 3D Sketcher. You may also define backbone atoms in any monomer unit if you want.
Begin with the model that you want to convert to a monomer unit. Place it in the current model space.
Open the Monomer Editor control panel by selecting the Edit/Monomers menu item from the POLYMER BUILDER card.
The following instructions mention double-clicking the atom. When you double-click an atom with the Define Head or Define Tail tool, Cerius2 automatically determines the atoms that will be used to define the torsion between monomers in the built polymer. If you want to define the torsion atoms yourself, you should click the head or tail atom once and then click the other two atoms that define the torsion.
![]() Click the Define Head tool. Double-click the atom that you want to be made into the monomer head. By default the monomer head is colored magenta.
Click the Define Head tool. Double-click the atom that you want to be made into the monomer head. By default the monomer head is colored magenta.![]() Click the Define Tail tool. Double-click the atom that you want to be made into the monomer tail. By default the monomer tail is colored light blue.
Click the Define Tail tool. Double-click the atom that you want to be made into the monomer tail. By default the monomer tail is colored light blue.
| At present, the Polymer Builder can use monomers with only one head and one tail. |
Removing head and tail definitions
By default, when you define a head or tail atom, the definition for any previously defined head or tail (respectively) is removed. You can change this behavior by unchecking the Remove old Head/Tail check box in the Monomer Preferences control panel.
![]() If you want to remove head or tail definitions, click the Remove Head or Tail linkage tool and click the incorrectly defined atom to remove the definition.
If you want to remove head or tail definitions, click the Remove Head or Tail linkage tool and click the incorrectly defined atom to remove the definition.![]() You can also change a head into a tail (and vice versa) without changing the defined torsion atoms by using the Change linkage tool.
You can also change a head into a tail (and vice versa) without changing the defined torsion atoms by using the Change linkage tool.
You may want to define backbone atoms in your monomer units. This is helpful if you might want to easily display or select backbone atoms in your built polymer, which can often give you a better understanding of its overall structure.
![]() To define an atom as a backbone atom, use the Define Backbone tool.
To define an atom as a backbone atom, use the Define Backbone tool.
Checking the Guide? check box gives you on-screen help (in the upper left corner of the model window) on the monomer editor.
Please see the on-screen help for additional help on the controls in these panels. Information on building and editing models and on selecting and displaying atoms according to various properties is contained in Cerius2 Modeling Environment.
Editing monomers
You can edit all monomer models with any of the model-editing tools found in the Visualizer main control panel.
Begin with the model that you want to edit. Place it in the current model space.
Open the Monomer Editor control panel by selecting the Edit/Monomers menu item from the POLYMER BUILDER card.
Chiral centers are used by the polymer builder to determine inversions, for example when building syndiotactic or atactic polymers (see Tacticity).
![]() If the monomer has any chiral centers, define them by setting the RECTUS/SINISTER popup as desired and then clicking the Define center tool and then clicking the center atom.
If the monomer has any chiral centers, define them by setting the RECTUS/SINISTER popup as desired and then clicking the Define center tool and then clicking the center atom.![]() You can invert the chiral center: click the Invert center tool and then click the chiral atom.
You can invert the chiral center: click the Invert center tool and then click the chiral atom.
By default, when you define a tacticity (chiral) center, the definition for any previously defined center is removed. You can change this behavior by unchecking the Remove old tacticity center check box in the Monomer Preferences control panel.
Monomers that you create and/or edit can be saved and loaded just like any other model created in Cerius2.
The MSI file format is particularly recommended because it includes chirality information (which is saved within the atom names).
Checking the Guide? check box gives you on-screen help (in the upper left corner of the model window) on the monomer editor.
Please see the on-screen help for information about all the controls in these control panels. Information on editing, saving, and loading models is contained in Cerius2 Modeling Environment.
Using monomers created with other programs
There is no industry-standard description of how monomers and their linkages are represented, so different programs use different representations. However, Cerius2 enables you to convert files of other formats to the current Cerius2 format, while properly interpreting the head/tail group information.
Open the Monomer Editor control panel by selecting the Edit/Monomers menu item from the POLYMER BUILDER card.
In the Polygraf and Biograf programs, a monomer head is represented by an atom named HX and a monomer tail by an atom named TX. Click the Convert from Xgraf action button to convert any atoms with these names to hydrogen atoms and add Cerius2 monomer head or tail groups. Default torsion angles are generated.
Prior to version 3.0, Cerius2 used a different representation for monomer heads and tails. For a monomer head, a pair of dummy atoms (J2 and X) indicated the head position and the torsion to be used for building. Click the Convert from Cerius2 v2.0 action button to replace the J2 atom with hydrogen and to remove the X atom. Similarly, the monomer tail was represented by a pair of atoms (J1 and X). Clicking the Convert from Cerius2 v2.0 action button additionally replaces these by a hydrogen atom and a monomer tail linkage object, respectively. Default torsion angles are generated appropriately.
Monomer or polymer structures loaded from Insight II .car/.mdf files do not explicitly contain linkage atoms. Instead they contain knowledge of the backbone going from one hydrogen atom to another. Clicking the Convert from InsightII action button adds head and tail linkages to the atoms at each end of the backbone. By convention, the head is chosen to lie closer to any sidegroup than does the tail. If the assignment of head and tail is not as desired, they can be swapped by using the Change linkage tool on the Monomer Editor control panel (see Editing monomers).
Please see the on-screen help for information about all the controls in these control panels.
Following some introductory material (below), this section contains information on:![]()
Homopolymers
General procedure
Standard monomer units and end units are loaded with monomer choosers on the Homopolymer Builder control panel.
Open the Homopolymer Builder control panel by selecting the Homopolymer menu item on the POLYMER BUILDER card.
Specify the type of monomer to be used in the polymerization from the Monomer popup.
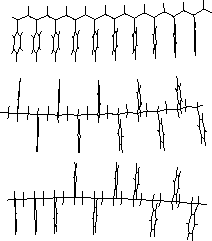
If the monomer being polymerized has a single chiral center, change the tacticity if desired. For information on tacticity, see Tacticity. By default, an isotactic polymer (see Figure 2) is built.
Change the head/tail orientation of the monomers if desired. By default, they are oriented so that the tail of each monomer is attached to the head of the previous monomer in the sequence.
Change the torsion angles if desired. Using the defaults builds a polymer with torsion angles taken from the monomer model. For information on setting torsions, see Torsion angles.
The random-number generator is used in the homopolymer builder for setting tacticity, orientation, or torsions randomly if such options are chosen. Setting the Random seed to a particular value allows regeneration of specific structures.
Click the BUILD pushbutton in the Homopolymer Builder control panel. The linear homopolymer is built in the current model space, overwriting any existing model (unless specified otherwise in the Homopolymer Preferences control panel).
Please see the on-screen help for information about all the controls in these control panels. See Specifying monomer units for information on using monomer choosers.
Homopolymers containing chiral centers can be polymerized in several stereoconfigurations. Cerius2 offers a choice of three tacticity options (Figure 2):
The meso-diad ratio is the relative proportion of isotactic monomer pairs in a given polymer. Thus, a polymer with a meso-diad ratio of 0.0 is a syndiotactic polymer, a polymer with a ratio of 0.5 is a random atactic polymer, and a polymer with a ratio of 0.90 is a predominantly isotactic polymer containing some syndiotactic diads.
Preparing the monomer
For syndiotactic and atactic homopolymers, the monomer to be polymerized must have a chiral center. If the chiral center has not already been defined, follow the instructions under Defining chiral centers.
Open the Homopolymer Builder control panel by selecting the Homopolymer menu item on the POLYMER BUILDER card.
Choose one of the three tacticity options: ISOTACTIC, SYNDIOTACTIC, or ATACTIC or specify the appropriate Meso-Diad Ratio (see, for example, Figure 2).
Please see the on-screen help for information about all the controls in these control panels.
Monomer head/tail orientation
How it works
The typical orientation of monomer units in a polymer is head-to-tail, that is, the tail of the monomer being added is connected to the head of the previously added monomer. However, this behavior can be changed by setting two probability values--the probability of an exposed head group on the growing polymer chain connecting with the head of a monomer being added to the chain and the probability of an exposed tail group connecting with the tail of a monomer being added.
Open the Homopolymer Builder control panel by selecting the Homopolymer menu item on the POLYMER BUILDER card.
Choose HEAD-TO-TAIL, ALTERNATING, or MIXED to set the head-to-head and tail-to-tail probabilities to one of three standard pairs of values. The actual values used are shown in the probability entry boxes.
Please see the on-screen help for information about all the controls in these control panels.
Torsion angles
How it works
Open the Homopolymer Builder, Random Copolymer Builder, or Block Copolymer control panel by selecting the Homopolymer, Random Copolymer, or Block Copolymer menu item (respectively) on the POLYMER BUILDER card.
Choose one of the three torsion options: RANDOM, DEFAULT, or ANGLE.
| This torsion angle setting applies to all monomers and is irrespective of polymer type (homopolymer or copolymer). |
Please see the on-screen help for information about all the controls in these control panels. Information on editing torsion angles within models is contained in Cerius2 Modeling Environment.
Following some introductory material (below), this section contains information on:![]()
Random copolymers
A copolymer is made up of two or more monomer building blocks.
In a random copolymer, the sequence of monomers in the polymer chain is irregular. Statistically, the proportion of each monomer type and the probability of one monomer following another are determined by the relative concentrations of the monomers and their relative reactivities.
General procedure
The random copolymer builder in Cerius2 enables you to specify the following:
Standard monomer units and end units are loaded with monomer choosers on the Random Copolymer Builder control panel.
Open the Random Copolymer Builder control panel by selecting the Random Copolymer menu item on the POLYMER BUILDER card.
Specify the types of monomer to be used in the polymerization from the Monomer popups.
Enter the concentrations of each monomer type in the respective Conc entry box. These are relative concentrations and therefore need not sum to unity. However, concentrations can be normalized (so they do sum to unity) by clicking the Normalize Conc action button.
To specify relative reactivities of the monomers, click the Reactivities... pushbutton to open the Monomer Reactivities control panel. For information on setting monomer reactivities, please see Reactivities.
Tacticity and head/tail orientation
Set the inversion (Invert entry boxes) and Flip probabilities for each monomer type. These control s (respectively) set the probability for inverting the chiral center and for flipping the monomer unit head-for-tail when the monomer unit is added to the growing polymer chain.
Set the torsion angles if you want something other than the default behavior. Using the defaults builds a copolymer with torsion angles taken from each of the monomer models. For information on setting torsions, see Torsion angles.
Use controls in the Random Copolymer Preferences control panel (see Random copolymer preferences) if you want to reset any preferences for how the build proceeds.
Click the BUILD pushbutton in the Random Copolymer Builder control panel. The described random copolymer is built in the model space that is specified in the Random Copolymer Preferences control panel.
Please see the on-screen help for information about all the controls in these control panels. See Specifying monomer units for information on using monomer choosers.
Random copolymer preferences
Several preference options are available for controlling the building of random copolymers. You can:
Open the Random Copolymer Builder control panel by selecting the Random Copolymer menu item on the POLYMER BUILDER card.
Check the Use reactivities box if you want to use both monomer reactivities (Reactivities) and concentrations to determine the frequency of monomers in the built chain.
Check the Force concentrations box to enforce the specified monomer concentrations. Otherwise the actual concentrations in repeated builds form a Gaussian distribution around the desired value.
Please see the on-screen help for information about all the controls in these control panels.
Reactivities
Concepts
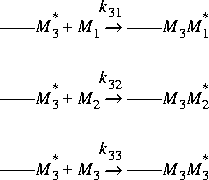
The two factors that determine the probability of a monomer of a given type joining the growing end of a copolymer chain are the concentration of the monomer [Mj] and the reactivity kij of monomer j with the growing chain's end i, so that kij [Mj]
![]() probability of monomer j joining a copolymer chain ending in group i.
probability of monomer j joining a copolymer chain ending in group i.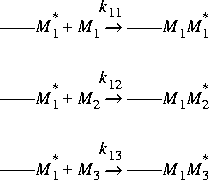

| Monomer | Relative reactivities | ||||
|---|---|---|---|---|---|
|
no.
|
name
|
|
1
|
2
|
3
|
| 1 | M1 | k11 | k12 | k13 | |
| 2 | M2 | k21 | k22 | k23 | |
| 3 | M3 | k31 | k32 | k33 | |
Experimental results on monomer reactivities (Young 1975) are often presented as reactivity ratios, r1 and r2, for polymer pairs:
Eq. 1
![]()
Eq. 2
A reactivity ratio greater than one indicates a preference for like monomers to link. Reactivities can be entered into the Cerius2 matrix and viewed as either relative reactivities or reactivity ratios.![]()
Monomer concentration values are set with the Random Copolymer Builder control panel (see Monomer concentrations). Monomer reactivities are set with the Monomer Reactivities control panel (this section).
Open the Random Copolymer Builder control panel by selecting the Random Copolymer menu item on the POLYMER BUILDER card.
Decide whether you want to use RELATIVE reactivities or reactivity RATIOS and select the appropriate Reactivities button in the Monomer Reactivities control panel. For an explanation of relative reactivities and reactivity ratios, see above.
Please see the on-screen help for information about all the controls in these control panels.
Block copolymers are polymers with regularly repeating sequences. The Cerius2 block copolymer builder enables you to build linear chains of repeating block sequences. ![]()
Block copolymers
The following must be specified to define a block copolymer:
Standard monomer units and end units are loaded with monomer choosers on the Block Copolymer Builder control panel.
Open the Block Copolymer Builder control panel by selecting the Block Copolymer menu item on the POLYMER BUILDER card.
Specify the types of monomer to be used in the polymerization from the Monomer popups.
For each monomer forming part of the superunit, enter the block Size and specify the Tacticity and the monomer Orientation.
The monomer orientation is specified by choosing HEAD-TAIL or ALTERNATE from the pulldown for constant head-to-tail or alternating head-to-head and tail-to-tail connections (respectively) or by entering two numbers, each between 0.0 and 1.0, specifying the probabilities of head-to-head and tail-to-tail connections, respectively. For more information on orientation, see Monomer head/tail orientation.
Set the torsion angles if you want something other than the default behavior. Using the defaults builds a copolymer with torsion angles taken from each of the monomer models. For information on setting torsions, see Torsion angles.
Use controls in the Block Copolymer Preferences control panel if you want to reset any preferences for how the build proceeds.
Click the BUILD pushbutton in the Block Copolymer Builder control panel. The linear block copolymer is built in the current model space, overwriting any existing model (unless specified otherwise in the Homopolymer Preferences control panel).
Please see the on-screen help for information about all the controls in these control panels. See Specifying monomer units for information on using monomer choosers.
A certain amount of editing can be performed on polymers that have been built using the polymer builder. The backbone can be defined or redefined, tacticity centers can be inserted or removed, and the model can be inverted about the tacticity center. In addition, a list can be obtained of the groupings within the model.![]()
Editing polymers
Place the polymer model that you want to edit in the current model space.
Open the Polymer Editor control panel by selecting the Edit/Polymers menu item on the POLYMER BUILDER card.
You may want to define backbone atoms in your polymer. This is helpful if you might want to display or select the backbone atoms of your polymer, which can often give you a better understanding of its overall structure.
![]() To define atoms as backbone atoms, use the Define Backbone tool.
To define atoms as backbone atoms, use the Define Backbone tool.
![]() You can define chiral centers by setting the RECTUS/SINISTER popup as desired, clicking the Define center tool, and then clicking the center atom.
You can define chiral centers by setting the RECTUS/SINISTER popup as desired, clicking the Define center tool, and then clicking the center atom.![]() You can invert the chiral center: click the Invert center tool and then click the chiral atom.
You can invert the chiral center: click the Invert center tool and then click the chiral atom.
If you want to remove the definition of a chiral center, click the Remove centers tool and click the incorrectly defined atom to remove the definition.
Clicking the List atomic groupings action button prints a list of the types and classes of all atomic groupings in the current model to the text window.
Checking the Guide? check box gives you on-screen help (in the upper left corner of the model window) on the monomer editor.
Please see the on-screen help for additional help on the controls in these panels. Information on editing models and on selecting and displaying atoms according to various properties is contained in Cerius2 Modeling Environment.
Several options are available that affect the visualization of monomers and polymers. These include:![]()
Monomer and polymer display
Open the Display Editor control panel by selecting the Edit/Display menu item on the POLYMER BUILDER card.
Use the Color Heads and Tails action button in the Display Editor control panel to color heads and tails of a monomer or polymer in the current model space. Specify what colors to use by choosing from the Head and Tail popups in the Display Preferences control panel.
If the Show Only Backbone Atoms action button in the Display Editor control panel is clicked, non-backbone atoms in the current model become invisible. If any atoms are selected, then only those selected in the current model that are not backbone atoms become invisible.
Use the Color Tacticity Centers action button in the Display Editor control panel to color any tacticity centers in the model with the tacticity center color. Specify what colors to use by choosing from the Tacticity popups in the Display Preferences control panel.
Use the Groupings popup to set the level of atom groupings at which you want to edit the display. Please see Listing atomic groupings for information on the various levels of grouping, types, and classes.
Use the Color Atoms action button to color atom groupings according to the attribute selected in the associated popup. The NUMBER popup item is particularly useful for distinguishing boundaries between groupings of the same symbol or class.
Please see the on-screen help for information about all the controls in these control panels.